The THS Home web application houses customizable "home pages". (Last updated: December 12, 2025)
THS Home can be an alternative to browser bookmarks or it can be used in addition to browser bookmarks. It allows you to save your favorite links within custom folders for easy access. Personally I like to keep a tab of my favorite browser loaded with THS Home so it is readilly available at all times. It is my browser's start up page and my browser starts and loads this page at system start.
The advantages of a web page for favorite links is that you don't need to worry about keeping them in sync within different browsers or computers. No matter which compatible browser you use on any computer, your THS Home page is available with all your favorite links.
This application has some Demonstrations available. You can get a flavor of THS Home before actually setting up your own Group and Environments.
THS Home Features
Custom Folders and sub Folders to organize and contain your Links.
All Folders and Links can be easily moved using Drag and Drop.
Folder contents can be sorted. Sorting is optional. See Sort.
Search for text within any Folder or Link. See Search.
Almost all actions are accomplished without re-loading the page.
All page Folders and Links are automatically saved in a database at the server.
Pressing a Link opens a new browser or tab to display the Link's web page.
The banner can have an optional picture in the upper left corner.
The body can have one or more pictures that can rotate on a time interval.
THS Home has multiple color themes. See Color Themes
Ths Home is capable of hosting multiple unique home pages. They are organized by Groups and Environments. Each home page resides within its own Environment and environments reside within a Group.
In order to create your own home page you must first create a new group, or log into an existing group, and then create a new environment for your home page.
Groups
Multiple groups can be created within THS Home.
Each group has a name and password to log in with.
Groups can be assigned to, or named for, things like organizations, companies, families, individuals, or whatever you want.
Each group contains one or more environments.
Any environment within a group can be selected by anyone that signs into that group.
Environments
Multiple environments can be created within each group.
Each environment has a name to identify it.
Each environment is unique and is where a single THS Home page resides.
An environment can be assigned to entities within the group, like teams or individuals or whatever you want.
An environment's THS Home page consists of your custom folders and favorite links.
Notes
If a group name and password are known to a single person, then it and all environments are therefore private. I have my own personal private group with a single environment for my THS Home page.
If a group name and password are known to multiple persons, then it and all environments are therefore shared within those that know the group name and password. This is a convenient way to pull multiple environmnts together in one group. This then requires co-ordination and trust between those in that group.
If a group name and password are available to anyone, then it and all environments are therefore public. This is the case of the THS HomeDemonstrations but there are internal restrictions to these.
About Browsers, Javascript and Cookies.
This application has been written for desktop browsers. Currently mobile browsers are not supported. Recommended browsers are Google Chrome, Mozilla Firefox or Microsoft Edge. Other browsers may or may not work, they were not tested.
This application utilizes the capablilties of HTML5, specifically "drag and drop". Therefore it is required that your browser supports HTML5 or later. Most of the latest versions of modern desktop browsers support HTML5.
This application requires that Javascript is turned on in the browser being used. It will not run without Javascript.
Cookies are also required. Cookies are used to keep track of the Group and Environment you have logged into. Once you have successfully logged into a Group and Environment a "pseudo session" is established by using cookies. Once logged in, this "pseudo session" enables you to bypass the login page on future access to THS Home and go directly to that Group and Environment home page for the previously logged in Group and Environment. Cookies are unique to each browser and therefore so are Pseudo Sessions. See Pseudo Session.
Getting Started.
If you haven't tried the Demonstrations yet, it might be a good idea.
There are two variations to getting started, creating a new Group, or using an existing Group.
Creating a new Group.
If you don't have a Group to join, or don't want to join, you need to create a new Group of your own. This can be your own personal Group, or it can be a new Group others will join with you. Follow the Create New Group procedure in the THS Home Login page. You will be taken to the Environment selection section.
Using an existing Group.
If there is an existing Group available for you to join, then all you have to do is log into that Group by following the "Log in" section of the Log into an existing Group procedure in the THS Home Login page. You will be taken to the Environment selection section.
In the Environment selection section, you can select an existing Environment that you want to use, or you can crreate a new one.
Once you have an Environment, you have your THS Home page. If the Environment is new, the THS Home page is a blank with a "New" pseudo folder to start with. If you have selected an existing Environment then it will be already populated with Folders and Links by others who are using it.
THS Home Web Pages.
The Ths Home application is composed of the following web pages:
The Helper Solution (thehelpersolution.jsp)
THS Home Login (thsHomeLogin.jsp)
THS Home (thsHome.jsp)
THS Home Contact Us (thsHomeContactUs.jsp)
An administrator's page.
The Helper Solution
This page is displayed when entering the web site. It is an overview of The Helper Solution and its "Home" page.
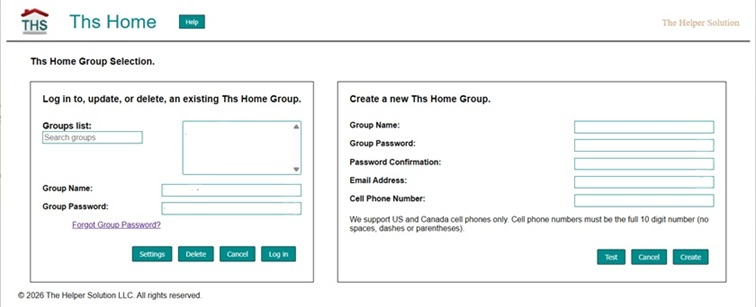
THS Home Login
This page is used to log into an existing THS Home page. It is also used to manage the Groups and Environments where THS Home pages reside. See THS Home Capabilities and Organization.
• Select an existing home group to use. • Update an existing home group (in settings):
• Change an existing home group password. • Change or delete an existing home group email address. • Change or delete an existing home group cell phone address.
• Create a new home group. • Delete an existing home group.
This selection has two options:
Log into, change settings of, recover forgotten password for, or delete an existing group.
You can limit the Groups List by entering the leading characters of the group name in the Groups List (Search Groups) field.
Note: Home Group Names are alphanumeric only.
Log in: • Enter an existing Group Name or select one from the Groups List. • Enter the Group Password. • Press the Log in button.
Change Settings: • Enter an existing Group Name or select one from the Groups List. • Enter the Group Password. • Press the Settings button.
In the "Group Settings" dialog you can do any or all of the following:
Change the group password.
Enter the new password in the Password and Password Confirmation fields.
Enter, change or delete the group email address.
To enter or change the email address, enter the new email address in the Email Address field.
To delete the email address, press the Delete button next to the Email Address field.
Enter, change or delete the group cell phone number.
To enter or change the cell phone number, enter the new cell phone number in the Cell Phone Address field.
To delete the cell phone number, press the Delete button next to the Cell Phone Number field.
If you changed, or entered a new, email address or cell phone number, you can test them using the Test button.
After completing any or all of the above, Press the Update button.
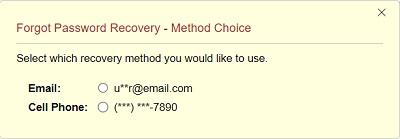
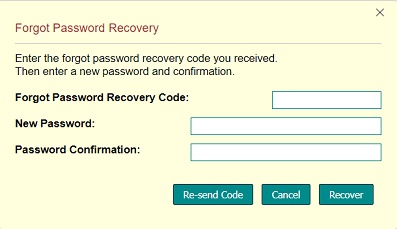
Recover Password:
Password recovery is accomplished by changing your Group password. THS Home will send you a "Recovery Code". You then enter that "Recovery Code" along with your new password.
NOTE: "Recovery Codes" expire 10 minutes after they are sent.
The methods used to send you the "Recovery Code" are either email or cell phone text. The email address and/or cell phone numberr must already be on file for the Group whose password you are trying to recover. If only one is on file, then it will be used. If both are on file, then you will have to select which one to use. If neither is on file, it will take an administrator's process to reset the password.
Cell phone text message charges may apply.
To initiate the Password Recovery, perform the folllowing:
Enter an existing Group Name or select one from the Groups List.
Group Passwordmust be left blank.
Press the "Forgot Group Password?" link.
If the Group has both an email and cell phone address, the "Forgot Password Recovery - Method Choice" dialog will be displayed:
In the "Forgot Password Recovery - Method Choice" dialog you can select which method should receive the "Recovery Code".
If the Group only has an email or cell phone address but not both, or after you have selected a choice in the "Forgot Password Recovery - Method Choice" dialog, the "Recovery Code" will be sent and the "Forgot Password Recovery" dialog will be displayed.
In the "Forgot Password Recovery" dialog you must:
Enter the "Recovery Code" you received via email or cell text in the "Forgot Password Recovery Code" field.
Enter a new group password in the "New Password" and "Password Confirmation" fields.
Press the Recover button.
Sometimes it takes a while for the email or cell text to be received so you should wait for at least 10 minutes (the "Recovery Code" expiration time). If for some reason you have not received the "Recovery Code" in that time, you can press the Re-send Code button to receive the "Recovery Code" again. Keep in mind that this will be the same code originally sent before in this recovery session, so it is possible you will still receive the first one followed by the second one.
If you back out the current recovery and start a new recovery, you will get a new "Recovery Code".
After you successfully entered a new password, you can use it to log into your Group.
Delete: • Enter an existing Group Name or select one from the Groups List. • Enter the Group Password. • Press the Delete button. • Answer the Confirmation dialog question.
Create a new group.
Note: Home Group Names are alphanumeric only.
• Enter the new Group Name. • Enter the new Group Password. • Enter the new Group Password again in Password Confirmation. • Optionally enter your Email Address. • Optionally enter your Cell Phone Number. • Optionally test any entered Email Address or Cell Phone Number using the Test button. • Press the Create button.
Email Address and Cell Phone Number are used for online forgotten password recovery, and nothing else.
Online forgotten password recovery is not possible without at least one of the email or cell phone address. If these are not present it would require an administrator's action to force a new password.
Cell phone text message charges may apply.
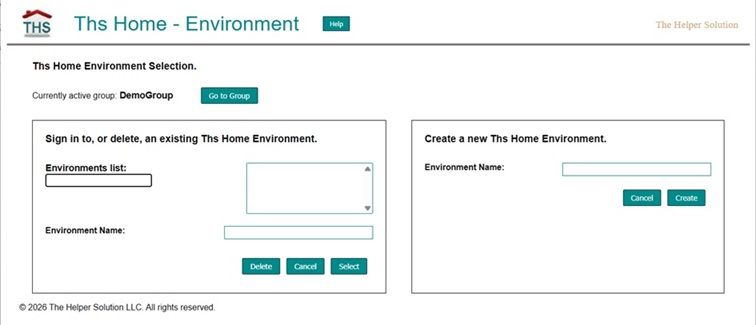
THS Home Environment Selection
This selection allows you to:
• Select an existing home environment to use. • Create a new home environment. • Delete an existing home environment.
This selection has three options.
Return to the indicated Group selection.
Press the Go to Group button.
Select, or delete, an existing environment.
You can limit the Environments List by entering the leading characters of the environment name in the Environments List (Search Environments) field.
Note: Home Environment Names are alphanumeric only.
Select:
Enter an existing Environment Name or select one from the Environments List.
Press the Select button.
Delete:
Enter an existing Environment Name or select one from the Environments List.
Press the Delete button.
Answer the Confirmation dialog question.
Create a new environment.
Note: Home Environment Names are alphanumeric only.
• Enter the new Environment Name. • Press the Create button.
THS Home
This is the "home page" for the signed in Group and Environment. It displays the folders and links that belong to an Environment within a Group. It is the "meat and potatoes" (centerpiece) of THS Home.
THS Home Components
This page is organized into five sections which are:
Links Overlay Miscellaneous links overlay that slides up from the bottom of the page.
Banner
Top of the page elements. This is the area above the page wide Menu Bar at the top of the page.
Banner Image
Small custom image displayed at the top left corner of the page. A config switch controls display of this image. This is retrieved from the Environment Banner Pool. See Images below for more information.
Banner Text
The page descriptive text. This defaults to "THS Home". This is always displayed. It can be changed in config.
Group and Environment
This shows the group and environment being used to display the current page. A config switch controls display of this.
Current Date
The current day of week and date. A config switch controls display of this.
Owner's Name
The developer and owner of THS Home. This is also a link to the owner's web page.
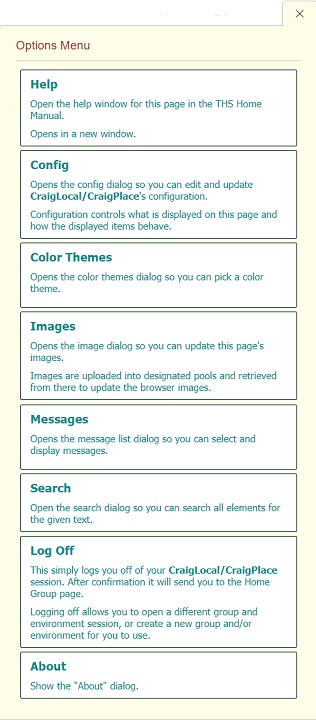
Options Menu
This 3 horizontal bar menu button (sometimes called hamburger menu) opens an "Options Menu". Each button within this menu provides additional options and contains the button name and information clearifying it's purpose. This menu will adjust to the size of the browser window. If the menu adjustment is too short for all button contents to be visible, a vertical scroll bar will be enabled so you can scroll to all of the buttons.
The available options are:
Help
Opens the THS Home Manual at the THS Home section.
Config
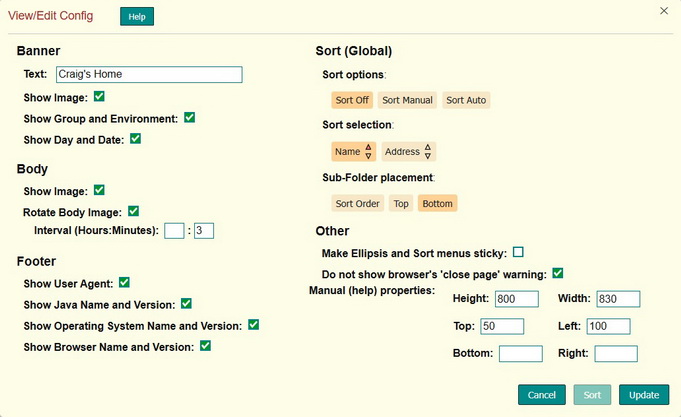
Display the config dialog. It allows you to set display options for THS Home page environments. Configuration is stored with the environment that is current at configuration time. Therefore each THS Home page will have its own unique configuration. See Config. Global Sort is also controlled in the config dialog. See Sort.
Color Themes
Display the color themes dialog. This allows you to select a color theme. These selections are stored at the browser's local storage. This means that each browser (user) that accesses THS Home will use it's (their) own color theme.
Images
Display the image upload dialog. In addition this dialog contains a View Image Pools button that allows you to see the state of the image pools for the current Group/Environment being used. See Images.
Messages
Display the messages dialog to view and deal with any messages. Messages are used to inform users of this application about impending maintenance outages or any other information that may be useful.
Search
Display the search dialog which allows you to look for text in all of the Folders and Links. See Search.
Log Off
This simply logs you off of your current session. After confirmation, you will be taken to the Home Group page (THS Home Login). This also allows switching environments within your group or switching to a different group. Groups and their environments can be created or deleted on that page. Logging off destroys the current pseudo session which will require you to log in again.
About
Displays the about dialog. It shows a brief description of the application along with the version number and copyright notice.
Menu Bar
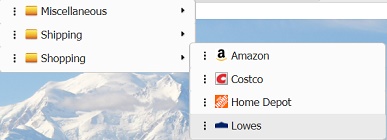
This is a page wide bar where custom Folder and Link elements can be stored. This is the top of the menu elements "tree". The information below describes the organization of these Folder and Link elements:
The first time a Group and Environment is created, the Menu Bar wil look like this:
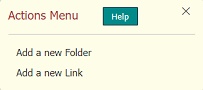
The "New" pseudo folder consists of a limited Action Menu under the Elipsis button. See Action Menu for more information.
After a real Folder or Link is created (as opposed to the "New" pseudo folder), a more normal Menu Bar looks like this:
Menu Lists
These are lists of the Menu Bar Folder elements. Both Link and sub-Folder elements can be stored in these lists. These lists display when your cursor hovers over the list's Folder. They display on top of any Body Image.
Folders and Links
These are displayed within the Menu Bar and Menu Lists. Folders contain other Folders and Links.
All Folders and Links can be dragged and dropped within the Menu Bar and Lists. See Drag and Drop.
Ellipsis (⋮)
One of these is attached to each Folder and Link. Pressing this produces the Action Menu for that Folder or Link. It can be closed if you press the close button or one of the action buttons. It will also close if your cursor strays away from the Action Menu or the Folder/Link it is attached to unless you have set the Config "Make Ellipsis and Sort menus sticky" flag.
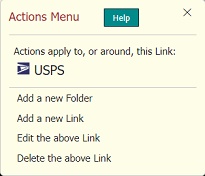
Action Menu
Produced when a Folder's or Link's Elipsis is pressed. There are three flavors of the Action Menu:
• Folder • Link • New
For Folder and Link, the Folder or Link information is displayed, along with four actions.
For New, nothing is displayed except for two actions.
Folder
Link
New
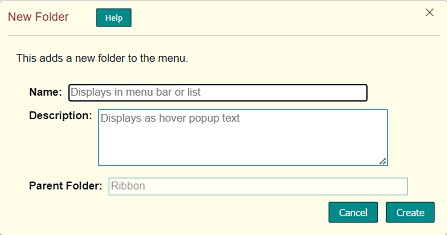
Add a new Folder
Opens the New Folder dialog so you can enter the new Folder's properties. The new Folder will be added following the Folder or Link whose action was used. If not exactly where you want it, you can use "drag and drop" to move it.
Enter the following New Folder fields:
The Name is displayed in the menu.
The Description is popped up when the mouse pointer hovers over the element.
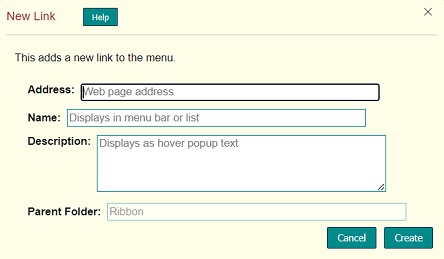
Add a new Link
Opens the New Link dialog so you can enter a new Link's properties. The new Link will be added following the Folder or Link whose action was used. This dialog is also opened when the Ths Home New Link Extension is used to capture the link of the currently open web page, but these will be added at the end of the Menu Bar.
Enter the following New Link fields:
The Address is used to open the link's page when the link is pressed.
The Name is displayed in the menu.
The Description is popped up when the mouse pointer hovers over the element.
Note: New links are added following the element that initiated this action. The Parent Folder indicates which folder this will be in and is for reference only. If not exactly where you want it, you can use "drag and drop" to move it.
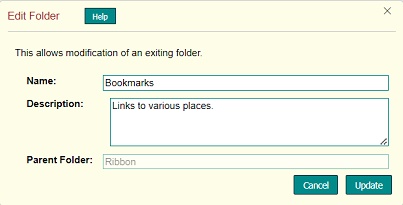
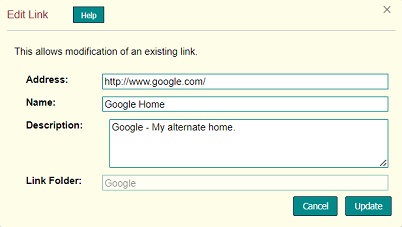
Edit the above Folder or Edit the above Link
Opens either the Edit Folder or Edit Link dialog filled with their current properties so you can modify them.
You can modify the following Edit Folder fields:
The Name is displayed in the menu.
The Description is popped up when the mouse pointer hovers over the element.
You can modify the following Edit Link fields:
The Address is used to open the link's page when the link is pressed.
The Name is displayed in the menu.
The Description is popped up when the mouse pointer hovers over the element.
Delete the above Folder or Delete the above Link
Initiates the delete of the indicated Folder or Link. This displays a confirmation dialog for verification of the delete action. Note: Deleting a Link will just delete that Link. Warning: Deleting a Folder will delete the Folder and all Folders and Links contained within.
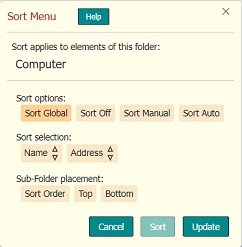
Sort Menu
Produced when a Folder is pressed. The Folder information is displayed along with the sort properties. It can be closed if you press any of buttons. It will also close if your cursor strays away from the Sort Menu or the Folder/Link it is attached to unless you have set the Config "Make Ellipsis and Sort menus sticky" flag. See Sort.
Body
The page body area between the Menu Bar and Trailer.
Body Image
This image takes up the whole Body area. This is retrieved from the Group Body Pool and Environment Body Pool. See Images for more information.
Menu Lists
These display on top of the Body Image in this area. See Menu Bar/Menu Lists.
Trailer
Bottom of the page. Some information is shown here that may be of interest to you. Each of these has a config switch that controls its display.
User Agent
Your browser's information.
Java Runtime Name and Version
Java that is running this page.
OS Name and Version
Operating System your browser and this page is running on.
Browser Name and Version
Your browser that is displaying this page.
Links Overlay
These miscellaneous links are contained whithin an overlay that slides up from the bottom of the page when you press anywhere in the "Copyright" line. It closes when you move your cursor away from the overlay.
THS Home Contact Us Page.
This page is used to contact us about just about anything.
We do not have phone support so this is the only means of contacting us. This produces an email to our email in box and that is used for further connunication between you and us.
Administrator Page.
This is for THS Home Administration. This functionality is only used to address problems with groups and/or environments that come to our attention or for general system maintanance.
Full Disclosure:
This enables full access to THS Home groups and environments by opening an "administrative door" into THS Home. This is fully secured by only allowing a specific list of administrators to use it. When an administrator logs in, he/she must enter their name and password and that name must be in the valid user list. Also only valid users can manipulate the valid user list.
Drag and Drop.
Drag and Drop is the method used to change the location of both folders and links within the Ths Home page.
Folders and links can be moved within their folders or from their folder to any other folder in either the Menu Bar or any Menu List. This means all Folders and Links are both drag items and drop points.
A dragged item is dropped "after" the drop point, that is to the right of the drop point in the Menu Bar and below the drop point in the Menu List. This behavior changes depending on the location of the drop point within its container and its position relative to the item being dragged. If the drop point is at the start of its container (left of Menu Bar and top of Menu List) and the drag item starts adjacent to the drop point, then dragging the item to the drop point will end up "before" the drop point, that is to the left of the drop point in Menu Bar and above the drop point in the Menu List.
Dragging a folder includes all of its sub-folders and links.
Config
These configuration properties allow you to format the display of the THS Home page.
Configuration is attached to the environment. That means the configuration properties are stored with the current environment at configuration time. The effect of this is that each THS Home page has its own unique configuration.
An environment's Home page may be customized by setting the following configuration properties in the Config View/Edit dialog:
Banner
Text
This is the page description. It is always displayed. It's contents may be changed in this config field.
Show Image
If checked, the banner image will be displayed at the left of the banner at the top of the page, which will be to the left of the Banner Text.
Show Group and Environment
If checked, the banner group and environment currently logged into will be displayed in the banner at the top of the page to the right of the Banner Text.
Show Day and Date
If checked, the current day and date will be displayed in the banner at the top of the page to the right of the Group and Environment if displayed, or to the right of the Banner Text.
Body
Show Image
If checked, the body image will be displayed. It will fill the body area and adjust its size based on the browser window size. If not checked, the body area will be empty and display the color scheme background color.
Body Image Rotate
If checked and a valid "hour:minute" Interval is specified, the body image will rotate through all images in the body directory. The time interval must be a colon separated hour and minute. The hour is optional but the colon and minute are required.
Interval (Hours:Minutes)
The Interval is only required when Body Image Rotate is checked.
The first field is for specifying the interval hours. The second field is for specifying the interval minutes.
The hours are optional and can be empty or blank to specity zero hours. Otherwise the full range is 0 to 23.
The minutes are required and must be between 0 and 59.
Show User Agent
If checked, the browser's User Agent information will be displayed at the bottom of the page.
Show Java Name and Version
If checked, Java's name and version information will be displayed at the bottom of the page.
Show OS Name and Version
If checked, Operating System's name and version information will be displayed at the bottom of the page.
Show Browser Name and Version
If checked, the browser's name and version information will be displayed at the bottom of the page.
Sort (Global)
Folders that have their Sort Option set to Sort Global will be included in any global sort that is performed. Folders can override global sorts by setting their Sort Option to anything other than Sort Global. See Sort.
Other
Make Ellipsis and Sort menus sticky
If checked, Ellipsis Action and Sort menus will be "sticky", which means they will continue to display even if the cursor strays away from the menu or elements the menu is attached to. The menu will have to be closed manually.
If not checked, the Ellipsis Action and Sort menus will close automatically if the cursor strays away from the menu or elements the menu is attached to.
Only one "sticky" menu can be displayed at a time. Any attempt to display a second Ellipsis Action or Sort menu will produce an error.
Do not show browser's 'close page' warning
If checked, when closing the page, the browser's 'close page' warning will not be displayed which will cause an immediate close of the page.
Manual (help) properties
These properties determine the size and placement of the Manual (help) window. All values are in number of pixels.
Height and Width
The height and width of the manual display window.
The default values are: Height = 800, Width = 830.
Entering a different value for either or both height and width overrides their respective default. Clearing either or both height and width will revert to their respective default.
Top, Left, Bottom and Right
These determine the position of the manual display window on the screen.
The default values are: Top = 50, Left = 100.
Top positions the window the specified number of pixels from the top of the screen. Left positions the window the specified number of pixels from the left of the screen. Bottom positions the window the specified number of pixels from the bottom of the screen. Right pisitions the window the specified number of pixels from the right of the screen.
Either top or bottom can be used but not both. Either left or right can be used but not both.
Entering a different value for either top or bottom will override the top default. Clearing both top and bottom will revert to top's default. Entering a different value for either left or riight will override the left default. Clearing both left and right will revert to left's default.
Note that bottom and right may not be entirely accurate if the display scale and layout has been changed. In these cases you can either play with the bottom and right values to adjust for the different scale and layout, or you can revert to using the top and left which should always be accurate.
Cancel
This button cancels the current config processing and closes the "View/Edit Config" window.
Sort
This button initiates the Global Sort, which sorts all Folders that have their Sort Option set to Sort Global. See Sort for more information.
Update
Pressing this button will send the contents of the "View/Edit Config" dialog to update the configuration settings.
Color Themes
There are a number of color themes available for the THS Home web page. Within the Options Menu is a selection to display the Color Themes dialog. Within that dialog is a list of color themes you can chose from.
The top most selection in the color themes list is "OS Theme (light or dark)". If your computer has a color theme selection of "light" or "dark", selecting "OS Theme (light or dark)" will map the THS Home color themes "Light" and "Dark" to your computer theme. Also, THS Home's "Light" and "Dark" colors will automatically switch when the computer's color theme is changed.
Choosing any color theme other than "OS Theme (light or dark)", including "Light" and "Dark", will disregard any computer operating system color theme selection.
The color theme selection is stored in your browser's local storage. This means that each browser that accesses any environment within THS Home will have its own color theme. Color themes are not tied to any THS Home environment.
If no color theme has been selected, "Light" will be used.
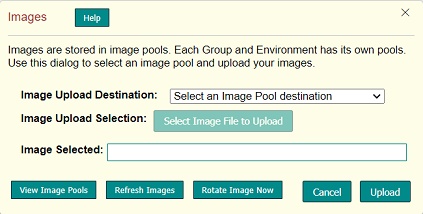
Images.
There are two images in the THS Home page. These are the "Banner" and "Body" images.
The images are stored in image pools at the server. Each Group and Environment has their own image pools. At THS Home page load, the images for the current Group/Environment are copied from the pool to the browser's image directories. This maintains the images independently from the browser image paths.
The images are stored so the body image rotation will display images from the Group Body Pool first and then from the Environment Body Pool. The sequence within each pool is dependent upon the order of the files in the directories and therefore unknown.
You can use the Images dialog to upload your images into these image pools.
To upload an image:
Select which image pool to upload the image into using the Image Upload Destination select list. There are three pools for each Environment:
Environment Banner Pool
Only the first image from this pool is loaded into the browser's banner image directory since there is only one banner image.
Group Body Pool
All images in this pool are loaded into the browser's body image directory. These will be seen by all Environments within the Group.
Environment Body Pool
All images in this pool are loaded into the browser's body image directory. These are only seen by the specific Environment.
Use the Image Upload Selection button to open the image selection dialog and select an image to upload. Your selection will be shown in the Image Selected field.
Press the Upload button to initiate the upload.
An Acknowledge window will display the uploaded file and pool names.
The Image Dialog standard control buttons:
The Upload button will initiate the upload of your image to the selected image pool.
The Cancel button cancels the operation and closes the images dialog.
The Image Dialog supplemental buttons:
The View Image Pools button shows all images within the pools for the currently used Group and Environment. You can also delete pool images there.
The Refresh Images button initiates a refresh of the images by re-copying them from the image pool to the browser directories. Effectively it is the same as refreshing the page.
The Rotate Image Now button initiates an immediate image rotate, if rotation has been set up.
Sort.
The THS Home Folders and Links can be sorted. There are two types of interconnected sort capabilities:
Global
A Global sort will initiate sorting of all Folders that have their Sort Option set to Sort Global. The Config dialog contains the Global sort criteria which will be utilized for a Global sort. Any folder that does not have their Sort Option set to Sort Global will not be affected by a Global sort operation.
Global sorts are performed by a separate class within a separate thread. Eventhough the sorts are relatively quick, this removes multiple folder sorts from the user's process, meaning the user will not have to wait for the Global sort to complete. However, this also means that care should be taken to not manipulate sort criteria while a Global sort is active. At Global sort completion an Acknowledge Message will be displayed. Since Global sorts are relatively quick, it is strongly recommended that you wait for the Acknowledge Message before doing any other process.
Folder
Each Folder contains a sort menu of its own where sort criteria may be specified. Folder sort criteria, where their Sort Option is set to anything other than Sort Global, will override Global sort for that folder.
Global and Folder sort dialog buttons
There are three buttons in each of these dialogs:
Update
Sends the current dialog settings to update the associated element's properties.
Sort
Initiates the sort function for the dialog. The sort criteria is taken from the element's properties, not those currently displayed in the dialog. That means if you make a sort criteria change, you must use the Update button to store them before using the Sort button.
Cancel
Cancels (closes) the dialog it is in.
Sorting is controlled by the following criteria:
Sort Options
Sort Options control weather sort is On or Off. If On, then is it manual or automatic.
Sort Global (Folders only)
The folder will follow the Global sort criteria. This is the default.
Sort Off
Sorting is "Off".
(Global) No global sort will take place at any folder. This is the default.
(Folder) No sorting will be done at the folder.
Sort Manual
Sorting is "Manual". Sorting only takes place when the Sort button is pressed. Sorting will be done based on the Sort Selection and Folder Placement that was last updated.
(Global) Those folders that are set to Sort Global will be sorted based on the Global sort criteria.
(Folder) The folder will be sorted based on the Folder sort criteria.
Sort Auto
Sorting is "Automatic". Folders will be sorted based on the Sort Selection and Folder Placement that was last updated. Sorts take place any time a folder element is modified, moved within the folder, and moved in or out of the folder. Sorts can still be manually initiated using the Sort button.
WARNING:
Setting Global sort to Sort Auto may cause problems if performing multiple updates or drag and drop movements which trigger automatic sort. This has the potential for multiple sort operations in quick succession, the result of which is undefined. It is highly recommended that Global Sort be turned off during the performance of multiple updates or drag and drop movements. When finished with the multiple updates or drag and drop movements, global sort can be set to Sort Auto again and you can issue a manual global sort with the Sort button.
Sort Selection
Sort Selection determines what is used for the sort, whether sorting is done by Name or Address. It also indicates weather sort is in ascending () or descending () order.
Name
The Name is the name of the Folder or Link that is displayed in the menu bar or menu lists. Each press of the Name button will flip between ascending () and descending () order.
Address
The Address is the Link's address, which is used to open the web page the link is associated with. Each press of the Address button will flip between ascending () and descending () order.
Folder Placement
Folder placement controls where the sub-folders within the sorted folders will be placed, within sorted order, at the top or bottom of the sorted folder's list.
Sort Order
This will place the sub-folders in sorted order by Name. This is only valid when Sort Selection by Name has been selected.
Top
This will place the sub-folders at the top of the sorted folder's list.
Bottom
This will place the sub-folders at the bottom of the sorted folder's list.
The default for Folder sort is Sort Global and the default for Global sort is Sort Off which means, initially, no sorting will take place at any Folder. It also means it is easy to sort all folders by setting the Global sort criteria and then turning on Global sort. In addition it means you will have to manually set sort criteria for each Folder that you do not want to participate in a Global sort operation. You should do this before turning on Global sort.
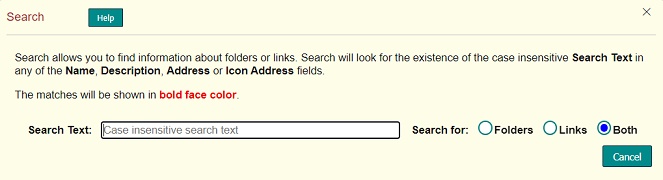
Search.
Search allows you to find information about any and all Folders or Links.
Search will look for the existence of the case insensitive "Search Text" in any of the following fields:
Name - Displayed in the menu. (Folders and Links) Description - Popped up when the mouse pointer hovers over the element. (Folders and Links) Address - Used to open a link's page when that link is pressed. (Links only) Icon Address - Used to get a link's icon. (Links only)
You can use the "Search for" radio buttons to limit the result to either Folders or Links. The default is Both.
This is an active key search, meaning that each key press will display the current search result based on what has been keyed, so far.
Each matching line in the result area will contain the contents of the above fields separated by a vertical bar " | ".
The Name will be followed by its comma separated "parent folder name list" in square brackets " [ ] ". The "parent folder name list" starts with the immediate parent and ends with the folder at the Menu Bar. An empty "parent folder name list" indicates the Folder or Link is in the Menu Bar and has no parent folder.
A Link's Address will be formatted as a pressable link. When pressed, it will open the resulting web page in a new window.
The matches will be shown in bold face color.
EG:
In these examples the relationship between the Folder/Link and its parent(s) can be read as: Name is in Parent1, which is in Parent2, etc.
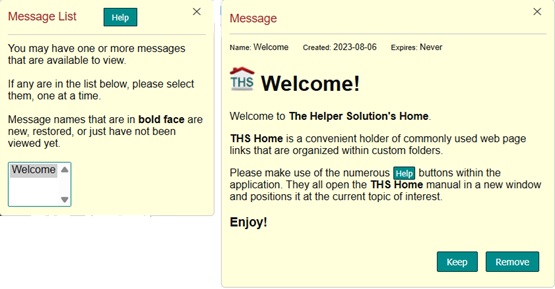
Occasionally a message will be created by THS Home Administration. These are solely for information purposes. Mostly these will be about the application, new version updates and other possible outages.
When a message is created, it's name will be loaded into every environment's message list. This will prompt the THS Home page to display a message list showing all messages in that environment's message list. These can then be selected for viewing.
After viewing the message, there are two options:
Keep the message in your environment's list so you can view it again at a later time.
Remove the message from your environment's list.
Both of these options close the message dialog. If remove is used and there are no more messages in the list, the list dialog will also be closed.
Messages are created with a name, which is what shows up in your environment's message list. Messages also have a creation and expiration date. These are all displayed at the top line of the message in small font. All messages are created or modified, and can be deleted by a THS Home Administrator. If deleted, that message name will be removed from all environment message lists.
The expiration date can be set to "Never", indicating that the message will not expire on its own. Messages with expiration dates that are not "Never" will expire on the specified date. They will be deleted from the database and removed from all environment message lists.
The messages you will see are in your environment's message list. Every environment has its own message list. It can contain all of the available messages, or a subset of them. If you remove a message, it is removed from your environment's message list. The message itself is still on the database. If your environment's message list contains a subset, prompts can appear indicating this condition and asking you if you want to restore all of the messages to your environment's message list again. If you don't see any of these prompts, then your environment's message list has all available messages.
"THS Home New Link" Extension.
THS Home New Link is a convenient browser extension/add-on available for Chrome, (Firefox soon) and Microsoft Edge.
If you are looking at a web page and decide you want it as a Link in THS Home …
You can manually open the New Link dialog and fill it out yourself.
OR
You can use THS Home New Link extension to easily do most of the job for you.
NOTE: If THS Home is open in a browser tab, it will be used. If not, a new tab will be opened and loaded with THS Home so it can be used. That means THS Home open, not THS Home Login.
NOTE: The THS Home page can only be loaded if your browser has a Pseudo Session cookie active for the THS Home page. If not, THS Home Login will be loaded and a "THS Home Extension" error will be displayed. You will have to:
Log on to your THS Home page.
Make the page you want to link to be the currently viewed page
Try using the THS Home New Link extension again.
When THS Home New Link is activated, it will:
Acquire information about the web page currently being viewed.
Look for an existing THS Home, or open a new one, and make it the currently viewed page.
In the THS Home page, open the New Link dialog and populate it with the acquired web page information.
You can manipulate the Link information to your satisfaction and then Create it. The new Link will be placed at the end of the Menu Bar. You can then use "drag and drop" to put it where you want.
Pseudo Session.
Upon successful login to a Group and selection of an Environment, THS Home will establish a "pseudo session". This augments the normal server web session.
Normal server web sessions have a limited life and eventually timeout which would normally require you to log in again. This would be a great inconvenience if you like to keep a browser tab loaded with THS Home and let it sit unused past the normal web server session timeout, or if you only load THS Home when you want to use it and you load it a number of times per day.
These inconveniences are eliminated with the THS Home pseudo session. The pseudo session is kept in your browser as a cookie. As long as this cookie remains, each access to THS Home will re-establish normal session connection to your THS Home page thereby bypassing the need to log in again. Cookies are unique to each browser and therefore so are Pseudo Sessions.
The Log off button will destroy the pseudo session and transfer control to the THS Home Login page where you will be required to log in again. This can be used to switch to a different group or environment, or to create a new group or environment to use. It is also used to just log off of the current session.
Warning: If you close the THS Home page, or close your browser, without using the Log off button, anyone that utilizes the same browser on the same computer will have access to the last used THS Home page, without having to log on.
There is very little risk with Pseudo Session since the only thing stored and displayed is web page links and their folders. The optional email and phone addresses that are used for password recovery are only accessable on the THS Home Login page and you need your user name and password to see or modify them. This pseudo session only enables direct access to your last used THS Home page if the Log off button has not been used. If you consider Pseudo Session to be a security risk, then you should be sure to use the Log off button.
Technical Information.
There are some technical things going on with THS Home that may, or may not, be of interest.
Favicon.
This is the term for the link icon that appears just to the left of the link name. It also appears in the browser when that link's page is displayed.
Most web pages have a favorite icon (favicon). Some do not. For those that do, THS Home attempts to get them from their web pages so they can be displayed with the link name. Technically THS Home gets the favicon link address from the link's web page and puts that in an image tag on the THS Home page so the browser can retrieve the favicon image.
It is possible that favicon locations move or are renamed or are deleted which will then produce an error. Ths Home captures these error events that are triggered when the browser can not retrieve the favicon image. The error event specifics are then placed into a queue for further processing.
There is also another background task that searches all links for their favicon. If not found, that link is placed on the queue for further processing. This is scheduled to run during "off hours" to minimize any user interference.
Ths Home also has a task that runs in the background to process the queue of errors. This process will attempt the same retrieval of the favicon link from the link's web page. If found, the link will be updated with the new favicon image.
The background process runs about every hour to see if the queue has any errors to process.
It is possible that the same link favicon address is retrieved again, in which case no processing will be done. This may be due to a missing favicon, in which case the link's web page should have the same difficulty displaying the favicon.
The whole purpose of the favicon processing is to update Ths Home when favicon addresses change. Before implementing this process, it was necessary to notice a missing favicon image and then run the "edit" of the link manually to update it. With this process, that is not necessary.
Demonstrations.
There are a couple of demonstrations available you can look at. These are "view only" demonstrations meaning you can interactively view the web pages and dialogs but you won't be able to do anything that would actually change the demonstrations.
Note that the images used in the other parts of this help use these demonstration pages.
The demonstration organization is as follows:
DemoGroup
This is the demonstration group. It contains two demonstration environments.
The password to log into this group is "DemoGroup.1".
DemoStartup
Selecting this environment will display the THS Home "new environment" page.
DemoEnvironment
Selecting this environment will display the THS Home page that has some Folders and Links.
Demonstrations are functional, to a point. Almost all capabilities are viewable and manipulatable on your browser, but those processes will not be allowed to update the server database. Therefore, anything you do can be undone simply by reloading the web page.
There are some processes that can not be done at all. However, enough is available to give you a flavor of the capabilities and feel of THS Home. So "play away" and see what THS Home can do for you.


 ) or descending (
 ) order.